|
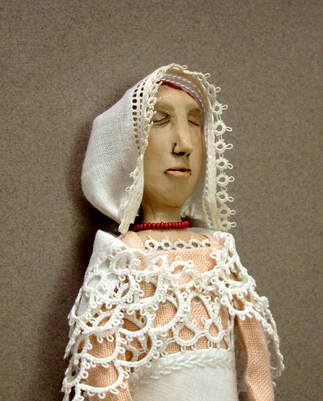
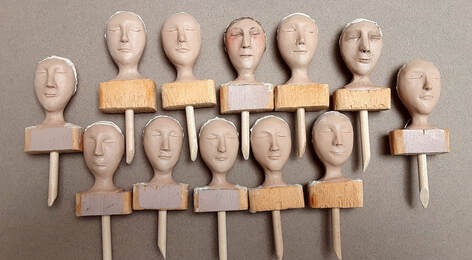
"The Idea Is Not The Work" is a statement that caught my attention in movie recently, The context was unrelated to art doll making, but it made me think. Maybe this is the mistake I've made all along. I've always figured that if I had an idea, then, ta-da, a doll was born. Failing to consider the work separate from the idea has led to frustrations and impatience. Here I will walk you through the process of developing the design of the "tube doll". I listed this as one of my art doll ideas for this year, but the idea spark happened last year, or the year before. I saw a wall installation in a gallery that was a series of ceramic cylinders. How cool would that be if each cylinder form had a head so that the piece looked like a group of people. I worked on this idea last year, eventually making "The Zipper Men". All of this makes it seem like I had already been working on this idea for a long time before I spent several more weeks on it this winter. So, I've got an idea. Now what? Experience has taught me lots of unsuccessful and tedious strategies, so I can avoid those now, I want a piece that will hang on the wall, either individually or in a group of 2 or 3 dolls. I want a polymer clay face and a fabric tube or cylinder that will represent a figure in a long dress or robe. I may try to figure out how to add arms. These will be 12 - 14" tall. The dolls pictured above are the first 2 experimental figures. I built up the head forms on 1/4" dowels using some aluminum foil and paper mache pulp. The polymer clay face needs support and it is much easier to model the clay against a firm surface. I like to use paper mache pulp to build up the back of the head. In this case I plan to paint it, but if I decide to add some fiber hair it will be possible to glue it on with water based glue. On the first doll, pictured on the left. I used a 1 1/2" diameter round wooden piece from the craft store for the shoulders, just slipping the dowel into the center. This was easy, but the round shape look awkward especially with the yarn glued in there and it didn't accommodate a hanger on the back. On the second doll, pictured on the right, I made the shoulder from a 1 1/2" long piece of 1x2, drilling a hole through the center and filing off the corners. This was better. I decided this would work best if the 1x2 was cut to a narrow 1/2" slice instead of the 1 1/2" piece. The dresses for these dolls were made from some quilted stuff on hand and I've come pretty close to working out the proportions of everything. I like the "tube" form flared a bit at the bottom and I'm beginning to work out the arms. These have a polymer bead made to look like clasped hands on a continuous wire running from shoulder to shoulder. These wire arms are wrapped with batting and fabric. OK. I decided I was ready to put all this to the test and make a special birthday gift for my mom, pictured below. A pale peach vintage linen napkin makes her dress. A pair of doilies, beautifully tatted and embroidered by my grandmother, are used for her shawl and apron. The lace on the handkerchief that makes her head covering is from the family stock of tatted things. Of course she has a necklace! I finally have 12 more heads almost ready to go. Each one still needs a little attention. These will make 4 groups of 3 dolls each. The linen and lace idea appeals to me and I would like to do one group in black and white. "Tube doll" is just a working name that doesn't make much sense at this point. I am now thinking of these as prayer or meditation dolls, but that is open to further developments.
0 Comments
|
Archives
March 2022
Categories |


 RSS Feed
